The wi-ther is a wireless thermal and environmental sensor. It requires no cloud service nor internet connection, but can make use of both, if you configure it to.
The wi-ther requires a USB connection, for power only.
The wi-ther is not designed to be exposed to dirt, rain, or other inclement conditions.
Some sort of data connection is required for use, several are supported. The first is wireless access point mode. As shipped, every wi-ther has access point mode enabled. You may connect to it with any WiFi client (e.g. laptop, tablet, smartphone). It will be named something like wither-9daec9 — the last six characters are random and unique to each wi-ther. You may also configure wireless client mode, where the wi-ther will connect to an existing WiFi hot spot. Finally there is a wired serial mode, available when plugged into a computer's USB port.
The wi-ther is compatible with ESPHome. An example YAML template (with ds75.h driver for the dedicated temperature sensor) is available.
This is primarily useful for Home Assistant integration. You'll need to understand both ESPHome and Home Assistant to make use of this. If you run into trouble, read the firmware page to flash back to stock.
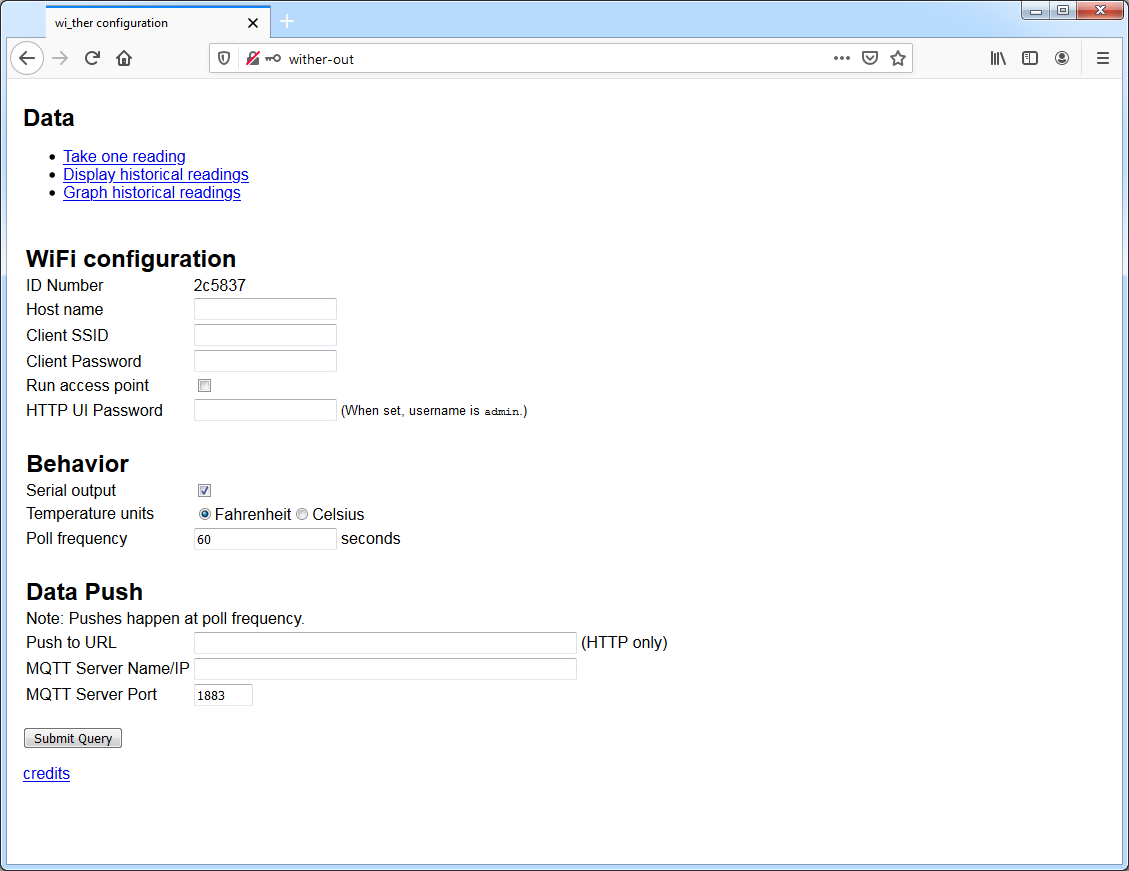
The wi-ther provides several configurable options to control its behavior.
Whether connected via access point or client mode, several features are available over wireless data.
Over its wireless interface, the wi-ther offers mDNS discovery. (mDNS is also known as ZeroConf and Bonjour.) It exports a service of type _http._tcp.local. with a configurable name that always starts wither-.
The wi-ther provides a simple web interface for both configuration and data export.
The environmental data is provided in three formats. First, one reading can be taken and returned in JSON format. See "Data Format" below for more detail.
This same data is also available at the "historical readings" link, but up to 1440 (one day's worth, in minutes) readings are presented at once. These are stored only in memory, and are lost if the wi-ther loses power.
This same set of in-memory historical data can also be loaded into a graph:

In this example the effects of an approaching storm can be observed: the temperature dropped as the humidity rose.
When connected to the wi-ther as an access point, browse to http://wi-ther/ to access the web interface.
The wi-ther contains a built in USB-to-serial adapter for data. Connect with 115,200 baud, 8N1. All commands are terminated by a newline. The most important command is h for help:
Available commands:

a    Toggle WiFi access point.
f... Set poll frequency (period in seconds).
h    Show this help message.
i    Show current settings.
n... Set new name.
o    Toggle JSON reading output (to serial).
p... Set new WiFi password.
P... Set push URL.
r    Restart.
s... Set new WiFi SSID.
S    Scan for WiFi networks.
u    Toggle temperature units (F/C).
w    Toggle WiFi client on/off.

Commands with "..." continue reading until end of line.
Also useful is i for information, which displays the current configured settings, for example:
ID number:        f84c57
Host name:        f84c57
WiFi SSID:
WiFi password:
Access point:     on
Serial output:    on
Temperature unit: F
Poll period:      60
Push URL:
Windows users may need to install the VCP Drivers (Virtual Com Port) in order to connect.
An example of the single reading data:
{
  "temp": {
    "am": 79.33,
    "bm": 80.09,
    "ds": 79.47
  },
  "hum": {
    "am": 53.60
  },
  "pres": {
    "bm": 1.007610082e5
  },
  "when_ms": 4832607,
  "name": "d51d88",
  "chip_id": 13966728,
  "flash_id": 1458400
}
The first three entries (temp, hum, and pres) are the temperature, humidity, and barometric pressure readings. The (relative) humidity is always in percent (0 to 100) and the pressure is always in Pascals (and in scientific notation as per typical JSON formatting). The temperature is returned in degrees, either Fahrenheit or Celsius depending on the configuration.
These three entries are each a dictionary. The keys are the name of the sensor that produced it, while the values are the individual readings. The sensors are am (Aosong AM2320), bm (Bosch BMP280), and ds (Dallas Semiconductor DS75). All three of these sensors produce a temperature reading.
The when_ms entry is the number of milliseconds since the wi-ther powered on. This can be useful for a client of the historical data feed to relate each reading relative to the real clock time when loading. The name is this wi-ther's configurable name, which defaults to its (hex format) unique ID number. The chip_id is the unique ID number (in decimal format), and the flash_id is the ID number of the internal flash storage chip.
The historical data feed presents an array of many such entries:
[
{"temp":{"am":77.71,"bm":78.92,"ds":78.34},"hum":{"am":60.90},"pres":{"bm":1.008379936e5},"when_ms":5313,"name":"in","chip_id":13383987,"flash_id":1458400},
{"temp":{"am":77.71,"bm":79.68,"ds":79.58},"hum":{"am":60.70},"pres":{"bm":1.008379936e5},"when_ms":65313,"name":"in","chip_id":13383987,"flash_id":1458400},
{"temp":{"am":78.26,"bm":79.62,"ds":79.25},"hum":{"am":60.10},"pres":{"bm":1.008360028e5},"when_ms":125313,"name":"in","chip_id":13383987,"flash_id":1458400},
{"temp":{"am":78.61,"bm":80.41,"ds":80.15},"hum":{"am":58.90},"pres":{"bm":1.008350014e5},"when_ms":185313,"name":"in","chip_id":13383987,"flash_id":1458400},
...
The wi-ther device should work out of the box. If you'd like to update it, please read the firmware page.